Tuesday, April 7, 2009

Video tutorial on Cheese

Introduction to Cheese


Setting up usb mic for cheese


Photos and videos with cheese


Cheese effects


Sample Cheese video and photo

Monday, April 6, 2009

Say Cheese!

Capturing webcam video and audio with Cheese


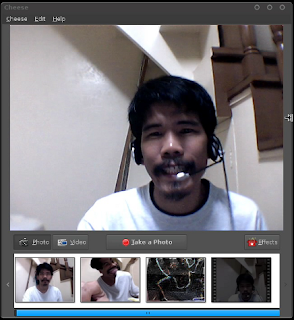
Let's start playing with our webcam with Cheese. Cheese is a webcam photo and video capturing program that runs on Ubuntu GNU/Linux. My camera is an A4Tech Live Messenger Webcam (modle PK-720MJ) with a built in microphone. I am running cheese on an UbuntuStudio (Intrepid) amd64.
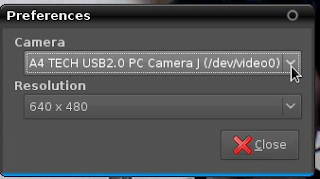
Setting up cheese

To select a webcam go to Menu->Edit->Preferences.


In the preferences dialog box choose your camera and resolution. Depending on the capabilities of your webcam, generally the higher the resolution the higher the lag in video.


Setting up the usb microphone

Initially I was unable to record from my usb mic so this is what I did:

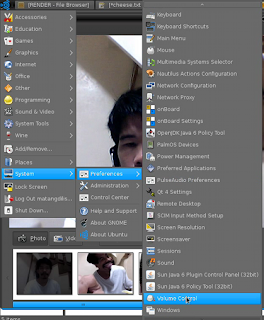
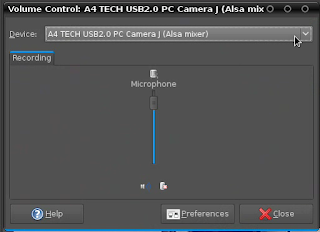
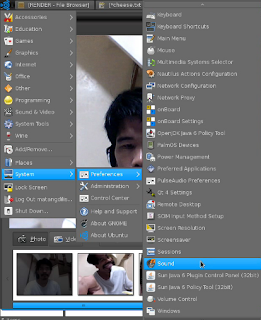
1. I went to Startup menu->System->Preferences->Volume Control. I selected my mic then turned up the mic.


2. I went to the Startup menu->System->Preferences->Sound. Then in the Sound Preferences dialog box I clicked on the Devices tab. I then set my Sound capture device for Audio Conferencing to my usb mic.


Taking a photo

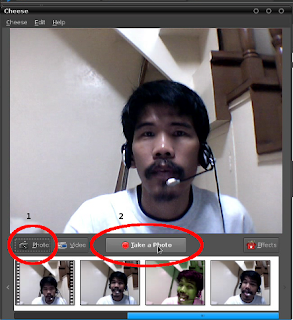
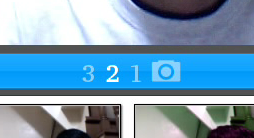
Click on the Photo butten then "Take a Photo" button. It will display a countdown, then your picture will be added to the strip bar of photos and videos.
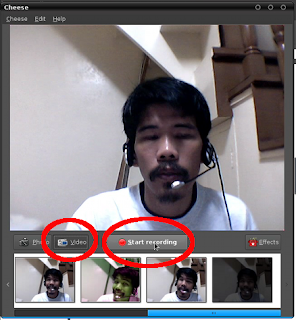


Recording video

Click on the Video button and hit "Start recording". Then click "Stop recording". Your ogv video will be added to the strip bar. You can click on that and save it in another folder. You can also convert it with mencoder to another format.


Converting to other format

If you have mencoder installed, open a terminal window and cd to the folder where you have your video. Then type this code (replace the name of the video). This will convert the video to an avi format with divx video codec and mp3 audio.

mencoder cheesesample.ogv -o cheesesample.avi -oac mp3lame -ovc lavc

Using Effects

Effects in cheese are applied during recording or photo shooting not afterwards like in a video editor.

To use effects click on the Effects button and click on the effects you want to use. Click on the Effects button again to go back to your video display and you'll see the effect applied in realtime to your video. You may then take your photo or record your video with the effect.


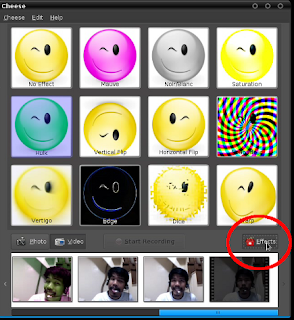
You can also combine effects. To remove the effect just click on the effect thumbnail again. To remove all effect, click on the No Effect thumbnail.

Sunday, April 5, 2009

Enabling JavaScript and Cookies in Opera

Moodle Review No. 2 Part 3: Moodle Environment, Browsers (Opera ) Opera 9.5

Opera is not a "free software", it is copyrighted by Opera Software ASA.

In order to enable Javascript in Opera go to menu->tools->preferences.


Then click on the Advanced tab and check Content-> Enable JavaScript


To enable cookies go to Cookies ->Accept cookies.


Finally click the OK button.

Here is the screencast of the entire process:

Saturday, April 4, 2009

Enabling JavaScript and Cookies in Konqueror

Moodle Review No. 2 Part 2: Moodle Environment, Browsers (Konqueror)

Konqueror 4.1.2

In order to enable JavaScript in Konqueror go to menu->settings->Configure Konqueror.


Then click on Java & JavaScript in the left list ->Enable JavaScript globally


Click on Cookies in the left list ->Enable cookies


Finally click on the OK button.

Here is a screencast of the entire process:


Friday, April 3, 2009

Enabling JavaScript and Cookies in Firefox, Konqueror and Opera under Ubuntu Intrepid

Moodle Review No. 2 Part 1: Enabling Javascript and Cookies in Browsers (Firefox)

Cookies

What are cookies? They're parcels of text sent back and forth between your browser and the server you are accessing. Usually used for authentication and other user information needed by the server.

A Moodle server may send you two types of cookies.

  • MoodleSession - essential, necessary to maintain login from page to page. It is destroyed when you log out or close the browser.
  • MOODLEID - not essential, safe to refuse, just for convenience. It remembers your username within the browser. When you return to the page, the username in the login page will be filled.

JavaScript

What is JavaScript? It's a usually a small computer program embedded in the html web page that you access. It makes your web page more interactive like allowing floating clocks on your web page. It can make your web page behave like a local application. Without it, the html usually is static and all you can do is read it. JavaScript adds fun in your browsing experience.

Why is it needed in moodle? For interactivity and functionality. It is also required in certain modules like when you display a secure window in quizzes, or use a timer.

Enabling JavaScript and Cookies in Browsers

JavaScript and Cookies are usually enabled by default in browsers for Ubuntu Intrepid. Firefox and Konqueror are "free software" and are distributed by Ubuntu, but Opera is not.

Firefox 3.0.7

To turn on JavaScript go to the menu->edit->preferences. The Firefox preferences dialog box will pop-up.


Click content->check Enable JavaScript.


To accept cookies click Privacy and under Cookies check Accept cookies from sites.


Here's a screenshot of the entire process:

Thursday, April 2, 2009

Comparison of look and feel of Moodle 1.9+ in the browsers Firefox, Konqueror and Opera

Moodle Environment Review No. 1: Browsers

I have compared the look of the current stable Moodle 1.9+ in the browsers Firefox, Konqueror and Opera running in Ubuntu Intrepid. The installation is set to the default theme.

Site Frontpage


Fig. 1: Moodle site front page in Firefox 3.0.7


Fig. 2: Moodle site front page in Konqueror 4.1.2


Fig. 3: Moodle site front page in Opera 9.5

Course Page


Fig 4: Course front page in Firefox


Fig. 5: Course front page in Konqueror


Fig. 6: Course front page in Opera

I don't see much difference. Perhaps if they were running under a different operating system with different default fonts, the difference in look will be more pronounced.

What we don't see is the difference in behavior due to JavaScript support. JS is supposed to be a cross platform scripting language but each browser implements the script differently at times and causes certain scripts in Moodle not to work in certain browsers especially when AJAX is turned on. Next post will review enabling of JS and cookies in the three browsers.

You can install Firefox and Konqueror in Ubuntu by using synaptic or opening a terminal and typing:
apt-get install firefox konqueror
For Opera, get the .deb file here: http://www.opera.com/download/?custom=yes. Install with Gdebi or go to the folder where you have the deb file and type:

sudo dpkg -i opera_9.64.2480.gcc4.qt3_amd64.deb

The latest is version 9.64 opera_9.64.2480.gcc4.qt3_amd64.deb but I have yet to install this version. Replace the filename of the deb file with what you have. Remember that Opera is not a "free software". It is copyrighted by Opera Software ASA so read the license for terms of use.

Wednesday, April 1, 2009

How to use the USB microphone of A4Tech Live Messenger Webcam in recordmydesktop

I have an A4Tech Live Messenger Webcam (model PK-720MJ) with a built-in microphone. In order to use it for recording audio in recordmydesktop, I simply click on "Advanced button".


Then click "Sound tab" and type hw:1,0 in the "Device textbox".


If you have more than one usb audio device attached, you can find out the card number and device number of the usb audio device you want to use. Open a terminal and type the following:

cat /proc/asound/cards


It will display the sound cards that you have. Mine look like this:

0 [NVidia         ]: HDA-Intel - HDA NVidia
HDA NVidia at 0xfe024000 irq 22
1 [J ]: USB-Audio - A4 TECH USB2.0 PC Camera J
A4 TECH A4 TECH USB2.0 PC Camera J at usb-0000:00:02.1-1, high speed


That means the first number after hw: is card 1. Now to find the second number which is the device number type the following in the terminal:

cat /proc/asound/devices

It will display the the sound devices for every card. Mine looks like this:

2:        : timer
3: : sequencer
4: [ 0- 1]: digital audio playback
5: [ 0- 1]: digital audio capture
6: [ 0- 0]: digital audio playback
7: [ 0- 0]: digital audio capture
8: [ 0] : control
9: [ 1- 0]: digital audio capture
10: [ 1] : control

You can see in line 9 my usb microphone. It is card 1, device 0 which is why I typed hw:1,0. If I wanted to use my other microphone, which is the on-board Nvidia I would use DEFAULT or hw:0,0 (line 7 above) or hw:0,1 (line 5 above). Which refers to the front and back mics.
 
Creative Commons License
This work is licensed under a Creative Commons Attribution-Share Alike 3.0 Unported License.